Wednesday, December 31, 2014

2014 Showcase, Part 3

It's the final part of the 2014 Showcase :)  Let's take a look.

Fall Fest, Four You

For September, I love this pumpkin birthday card that I sent to a good friend of mine.  Plus the color combo of orange, green, and purple is just fantastic.

Perfect Peacock, Work of Art

October's pick is this golden peacock because I love the colors and all the gold.  And also peacocks make me think of my mom, who has quite a bit of peacock stuff in her house.

Bright & Beautiful, Gorgeous Grunge, A Dozen Thoughts
For November, I had another tie and this Northern Lights card was one of them.  I thought that my background wasn't going to work at all right up until I actually finished it, and then I loved it!

Fall Fest, Perfectly Preserved, My Paper Pumpkin

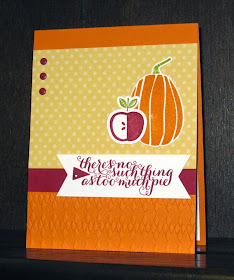
And the other November fave is this pie-riffic Thanksgiving card.  That sentiment stamp is just SO me.  And I do love both apple pie and pumpkin pie.

Santa Stache, Nacho card!

Last but not least, I couldn't resist this Santa and his oversized mustache.  This card just makes me smile :)  Not a bad way to end the year.

So starting tomorrow is a whole new stampy adventure!  Happy New Year, friends!

Tuesday, December 30, 2014

Nachos: Happy New Year

We're almost to the new year, and today is the final Nacho Average Color Challenge of 2014!  And we're going for the glitz this week too, check it out:


So here's my festive creation:


I used both gold glimmer paper and brushed gold cardstock.  So where did that super fantastically awesome die cut "happy" come from?  It's from the Hello You Thinlits which are coming soon in the Occasions mini catalog.  It also comes with the words "hello", "you", and "thanks", and coordinates with a stamp set.  Gotta love new toys!

If you get a few minutes, I hope you'll play along with the Nacho color challenge this week.  Have fun!

Supplies, all SU!
Stamps:  Alphabet Rotary, Gorgeous Grunge
Ink:  Basic Black, Smoky Slate
Paper:  Basic Black, Whisper White, Brushed Gold, Gold Glimmer Paper
Accessories:  Circles Framelits, Hello You Thinlits, Dimensionals

Monday, December 29, 2014

2014 Showcase, Part 2

Welcome back for Part 2 of the 2014 Showcase here at Snapdragon Stamps!  Let's go.

Eastern Influences
My pick for May is this scrapbook layout of the Golden Pavilion in Kyoto, Japan.  Some great pictures that I'm so glad are immortalized on a scrapbook layout, and a great excuse to use some of my favorite colors :)  However, I couldn't pick just one project for May, so here's a bonus:

Hello Lovely, Nacho card!

This card took under 5 minutes to make and I still love it.  That patterned paper is workin', y'all!  Proof that a really cute card doesn't have to take forever.

Wanderlust, World Map, The Open Sea, Nacho card!

June's pick is this travel-inspired card, which I immediately sent to a friend who travels so much that she makes me and the hubs look like shut-ins.  In three years, she and her hubs visited 50 countries!

Stippled Blossoms, Teeny Tiny Wishes, Nacho card!

My July pick is yet another Nacho card, this time anniversary roses.  I do love those roses.

Starburst Sayings, Alphabet Rotary, Gorgeous Grunge, Positively Chevron, Nacho card!

And finally, my August pick could be none other than this Princess Bride-inspired Inigo Montoya card.  I giggled like crazy the whole time I was making it and I know it gave my dad a chuckle when he opened it up, too.

One more part of the 2014 Showcase coming up, but first...ya know tomorrow is Nacho Average Challenges day :)

Friday, December 26, 2014

2014 Showcase, Part 1

Howdy, stampers!  As 2014 winds to a close, I thought I'd take a look back at all the stuff I've posted here for the past year and pick a favorite project for each month.  So instead of a Friday Flashback this week, here's the 2014 Showcase, Part 1!  And lemme just pat myself on the back here, haha.

Features Snow Swirled

For January, I chose this snowy layout.  I love the bright blue with the three pastel colors, and I love those photos from our house in England.  And I miss snow.  I think I've worn a jacket like, maybe three times since we moved to Alabama.  Okay, maybe four.

Perfectly Penned, Starburst Sayings, Nacho card!
February's pick is this bright and fun birthday card (even though there's a dog hair stuck in the middle of it in the photo).  Plus this blog post was one of the funniest ever I think; this is what happens when I blog late at night.

Best of Butterflies, Happy Day, Nacho card!
My March pick is all about the butterflies.  It's hard for me to do CAS cards, but this one just worked for me.  And who wouldn't want to get a butterfly smile in the mail?

Swallowtail, Yippee-Skippee!, Nacho card!
My April card is also butterfly-riffic, this time giant size.  I love bright fun happy colors and that Nacho color challenge delivered bright, fun, and happy in spades!  And you know what?  Three out of four projects I picked for this post were Nacho cards!  Love the Nacho challenges.

Showcase Parts 2 and 3 coming up soon.  Cheers, peeps!

Thursday, December 25, 2014

Concord Crush Christmas

Merry Christmas again, friends!  I managed to squeeze in one more project for Christmas, though it's not your traditional red and green.  Or even blue and snowflakes.


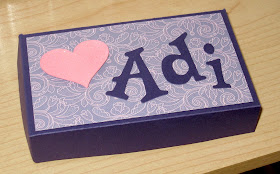
My sister-in-law Adrienne loves purple, so I had to make her gift card box purple.  I used Concord Crush because I have almost zero Elegant Eggplant DSP, and I think Concord pairs better with Wisteria Wonder anyway.  I thought it needed some glitz, so the heart is covered in Iridescent Ice EP which doesn't show in the picture but looks nice IRL.  And it's really difficult to heat emboss something that small without burning your fingers, just sayin'.

I ran out of time to really glam up the box though and the inside isn't decorated at all; I just did the insert in Wisteria Wonder and wrapped the accompanying Rolos in the same DSP as I used on the box top.  Should have probably at least put Merry Christmas or something on the inside, but there just wasn't enough time to get all fancy.

If you want it, here's the link to Qbee's tutorial that I used.

Hope you have a wonderful holiday!

Supplies, mostly SU!
Stamps:  None
Ink:  Versamark
Paper:  Concord Crush, Wisteria Wonder, Pretty in Pink
Accessories:  Sizzix alphabet (really, really old, not SU!), Sweetheart punch, Iridescent Ice EP, Dimensionals, Decorative Label punch used to hold the gift card on the inside

Wednesday, December 24, 2014

Merry Christmas 2007

Merry Christmas!  Today I've got the last layout I did for 2014 to share, and it just so happens to be pictures from exactly seven years ago today.


I'm a little sad to say this layout sat on my desk for two or three months before I finally got it finished.  And then it took me 20 minutes to find my journaling template so I could draw straight lines on my journaling block, but I finally got it finished!  This was Christmas Eve at my parents' house, and it just so happens that the hubs and I are here again today!  With those same four dogs plus one more (my brother didn't get his dog Dingo until after this particular Christmas, but Sadie, Vader, Ginger, and Cleo are still in the club).

Some detail shots:


I was going to do snowflakes, but then I remembered why I hate my snowflake Sizzlits.  They don't really cut all the way through the cardstock and they're a total pain, which is why Framelits are better.  But I went with the retired ornament punch instead.


I know I shared a Santa Stache card yesterday, but I couldn't resist using this nutcracker on my layout today!  Even though the mustache thing wasn't a thing in 2007, he's still too cute for words.  I actually had to stamp him twice; I colored him with watercolor wonder crayons but of course there isn't a Gumball Green crayon.  So then I tried to just watercolor with the ink, but weirdly it turned out like camouflage (so not what I was going for), so I had to start over on a new nutcracker image and I used Garden Green crayon instead.  Problem solved.  I did use markers for the tinier bits of his outfit though, the More Mustard trim and Real Red circles.

Merry Christmas!

Supplies, all SU!
Stamps:  Santa Stache, Tall Tales Numbers, Chrsitmas Greetings, Delightful Decorations
Ink:  Memento Tuxedo Black, Real Red, Ballet Blue, More Mustard, Basic Black
Paper:  Real Red, Ballet Blue, Whisper White, Gumball Green DSP
Accessories:  Deco Labels Framelits, Watercolor Wonder Crayons, Lucky Stars EF, ornament punch

Tuesday, December 23, 2014

Nachos: Staching Through the Snow

Good morning, peeps!  How are you this Christmas Adam?  Think about it...tomorrow is Christmas Eve :)  Anyway, as an early Christmas present, Nacho Average Challenges has a most excellent sketch for you!


I love this sketch.  You can use it six ways from Sunday and it will always look good.  So here's one more Christmas card for this year:


Can't help it, I love this card.  That Santa just looks so cheerful and that patterned paper makes me happy.  And when I was using the SAMJ to do the sentiment, I noticed that I'd gotten it curled up just a little so I made it curve a little more and I love how it turned out.  The rest of the sentiment is on the inside:


Quick and simple.  The only part that took me some time was cutting out the Santa, and even that wasn't arduous.

Merry Christmas, and I hope you'll join us for this sketch challenge :)  Check out the Nacho blog for more eye candy!

Supplies, all SU!
Stamps:  Santa Stache
Ink:  Memento Tuxedo Black, Real Red, Blushing Bride, Whisper White, Garden Green, Smoky Slate
Paper:  Real Red, Whisper White, Nordic Noel DSP
Accessories:  Banners & Labels Framelits, Lucky Stars EF, Dimensionals

Monday, December 22, 2014

Happy Hanukkah

Morning!  I thought I'd take a break from Christmas cards to share a quick and simple Hanukkah card I made for a friend of mine.


I wasn't lying when I said quick and simple :)  Still, I thought the menorah image was fancy enough that just a simple background of snowflakes worked just fine.  And at this time of year, quick and simple is the name of the game.

Gotta get back to wrapping presents.  Have a great day, peeps!

Supplies, all SU!
Stamps:  Jewish Celebrations
Ink:  Smoky Slate, Pacific Point
Paper:  Pacific Point, Shimmery White, All Is Calm DSP
Accessories:  Dimensionals

Friday, December 19, 2014

Friday Flashback: Peaceful Wishes

Howdy, folks!  It's the last Friday before Christmas, and you know what that means:  the stores are gonna be PACKED this weekend.  And also this is the last Christmas stamp Friday Flashback this year :)  This week's choice is Peaceful Wishes.

Also features Many Merry Messages

This is another one of those times that I could have sworn I'd used a retired stamp set a whole lot more often, but other than two other versions of this same card this is IT from the archives.  So I made a new card for today:


At least this time I managed to use different stamps and make a completely different card than the first time :)  Most of the time I don't go back and look at my previous creations before I make something new for the Friday Flashback, so every once in a while my new card winds up looking a whole lot like whatever was in the archives.  Anyway, here's a closeup:


I showed the card to the hubs and we both thought the pine cones could use a little glitter, which you still can't see well in the picture but I tried.  So the pine cones have a bit of sparkle, because sparkle is always a good choice on a Christmas card.

I used the festive color challenge at Colour Me...!


And the sketch from Mojo Monday:


And there's one more Christmas card done :)  Christmas cheers to you, peeps!

Supplies, last card only:
Stamps:  Peaceful Wishes, Fancy Flexible Phrases
Ink:  Baked Brown Sugar, Early Espresso, Always Artichoke
Paper:  Baked Brown Sugar, Early Espresso, Always Artichoke, Very Vanilla, Holly Berry Bouquet & Candlelight Christmas DSP
Accessories:  Circle Framelits, Dazzling Details glitter glue, linen thread

Thursday, December 18, 2014

Sneaky Peek

I'm taking a break from Christmas cards today, 'cause I got my Occasions mini/Sale-a-Bration preorder on Monday afternoon and I wanted to play with some new goodies.  Behold!


Meet Lotus Blossom, a new SAB stamp set available for free with a $50 purchase starting in January.  Unless you're a demonstrator like me, in which case it's available now for those of us with instant gratification issues.  It's a photopolymer set and the flowers are comprised of 3 different stamps; I didn't line them up completely right but it's pretty close even without the Stamp-a-Ma-Jig.

I admit, I had some trouble with this card because I *didn't* start with a sketch challenge.  I just cut a piece of Whisper White cardstock and kinda went with it from there and had to figure out everything as I went.  But I did use the color combination from The Color Throwdown:


I interpreted this as Mossy Meadow, Blushing Bride, Strawberry Slush, and Baked Brown Sugar.  Coulda been Christmasy, but I chose not :)

Thanks for stopping by today, peeps!

Supplies, all SU!
Stamps:  Lotus Blossom
Ink:  Strawberry Slush, Blushing Bride, Mossy Meadow, Baked Brown Sugar
Paper:  Strawberry Slush, Mossy Meadow, Whisper White, All Abloom DSP Stack
Accessories:  Fancy Fan EF, Dimensionals

Wednesday, December 17, 2014

The Man in Red

It seems like I've been doing a lot of things with Endless Wishes lately and not using the other Christmas sets I have, so today I decided to break out Santa Stache and make something.  What do you think?


I considered getting some white ink refill and using it to watercolor Santa's beard and part of his hat, but I kinda liked this the way it is, simple white-on-red.  The thing that took the longest on this card was deciding on the patterned paper :)  I used the brand-new sketch from Freshly Made:

Easy peasy lemon squeezy!  I made the background panels larger but definitely followed the sketch.

Well, that's it for me today, peeps.  I still need to write my Christmas letter and get packages ready to send and about a hundred other tasks before Christmas....cheers!

Supplies, all SU!
Stamps:  Santa Stache
Ink:  Versamark, Garden Green
Paper:  Pear Pizzazz, Garden Green, Real Red, Nordic Noel DSP
Accessories:  White EP, Dimensionals

Tuesday, December 16, 2014

Nachos: Stellar Christmas

Good mornin', Nacho Average Challenge chasers!  Do we have any of those?  I hope so.  This morning, we've got a great color combo for you:


Lost Lagoon and Pear Pizzazz are two of the colors in the All Is Calm DSP, so I had to use that for my creation:


I think it looks a little better IRL than it does on the computer screen.  And you might recognize the sketch from a few weeks ago:


So this is a double Nacho card :)  Check out the other Nacho DT creations and then go make something pretty for us!

Cheers, peeps!

Supplies, all SU!
Stamps:  Endless Wishes (again)
Ink:  Lost Lagoon, Pear Pizzazz
Paper:  Pear Pizzazz, Whisper White, All is Calm DSP, Silver Glimmer Paper
Accessories:  Stars Framelits, Hexagon punch, Dimensionals

Monday, December 15, 2014

Do You Wanna Build a Snowman?

It may have been a balmy 72 degrees here in 'Bama today, but I did build a snowman. 


With circle Framelits and glitter, anyway :)  Not the best picture in the world, but this is what I get for waiting until after dark to make my card and get it photographed.

The technique I used is called Glitter Window, basically you cut a shape out of cardstock and put packing tape over the hole, with the sticky side facing up.  Cover the packing tape with glitter, and whatever is under the glitter window you can stamp or decorate or whatever.  I left my white cardstock alone since it's a snowman :)  I did put the black Candy Dots on the packing tape before I added the glitter, and really I used Hologram Highlights embossing powder because either a.) I can't find my glitter or b.) I got mad at how messy glitter is and threw it away, and then blocked the incident from my memory.

But anyway!  I used the brand new sketch from Retro Sketches:


Actually I got the idea for doing a snowman like this from seeing a card at Ruth's Stamping Corner.  Hers was a shaker card, but it's what made me think of trotting out the old Glitter Window technique.

That's it for me today, peeps.  I'm off to Panera for dinner!

Supplies, all SU!
Stamps:  Endless Wishes
Ink:  Coastal Cabana, Pacific Point
Paper:  Whisper White, Coastal Cabana, Strawberry Slush
Accessories:  Circles Framelits, Neutrals Candy Dots, Hologram Highlights EP

Friday, December 12, 2014

Friday Flashback: Christmas Punch

It's Friday!  And that means Friday Flashback.  This week's featured stamp set is Christmas Punch, a hostess set from 2009-2010, and it's yet another example of my bad track record for actually using hostess sets.  (At least they're free?)  This Flashback is a bit on the short side.

Also features Weather or Not (mittens)

Yep, that's it.  The snowflakes on the background are from Christmas Punch.  As you might guess from the name of the stamp set, every stamp in it coordinates with a punch, and they're pretty cute even if I never got around to using them much.  But I did make a new card today:


That Santa stamp (haha, it's a stamp that looks like a postage stamp) is, I think, supposed to coordinate with the postage stamp punch but the outline didn't line up correctly.  So I punched out the image part with a 1" square punch and then put it on plain white cardstock that I punched out with the postage stamp punch.  Can't have the stamped image and punched edges not line up, it would offend my OCD.

Anyhow, I used this week's Nacho Average Challenges sketch because it's just perfect for showcasing smaller stamped images.


Well, peeps, that's all I've got for you this week.  Hope you have a great weekend; hubs and I will be volunteering for the Humane Society tomorrow so I get to play with puppies (sadly, the hubs already said I can't bring any of them home).  And then I need to write my Christmas letter and start getting cards in the mail, so busy busy!

Christmas cheers, peeps!

Supplies, last card only:
Stamps:  Christmas Punch, More Merry Messages
Ink:  Riding Hood Red, Blushing Bride, Marina Mist, Early Espresso
Paper:  Old Olive, Whisper White, Letters to Santa DSP
Accessories:  Riding Hood Red taffeta, 1" square & postage stamp punches, Dimensionals

Thursday, December 11, 2014

Very Merry Wishes

Well, if I only have a small selection of current Christmas stamps, then you're gonna be seeing the same ones a few times over :)  And today it's Endless Wishes.


Which is okay because I never used it last year.  This color combo (very similar to the one I used on Monday's gift card box) is from the Color Throwdown:


I'm still not a fan of hot pink with red, but it does kind of make for a playful color combination.  If I'd had Garden Green baker's twine I would have used that, but instead I found the gold twine that I hadn't used since I made swaps months ago and I figured I'd use a gold button too.  Because Christmas cards should sparkle, right?

I used this week's sketch from Freshly Made Sketches:


Fun sketch, I like it.  I like the white space on it...or in this case, Coastal Cabana space.

That's it for me today, peeps.  Hope you have a very merry day!

Supplies, all SU!
Stamps:  Endless Wishes
Ink:  Strawberry Slush, Coastal Cabana, Real Red, Garden Green
Paper:  Coastal Cabana, Real Red, Whisper White
Accessories:  Gold baker's twine, gold button, scallop border punch, Dimensionals

Wednesday, December 10, 2014

Silver Snowflake

Quick post today as I've got sticky toffee pudding just out of the oven and I need to finish the toffee part.


The only Christmas-specific stamp set I bought this year is Santa Stache (which I need to use more) and I miss having several seasonal sets to choose from.  So I dusted off Festive Favorites (which was recently on the SU! Clearance Rack for a hot second) and made a snowflake card.  I used this week's Colour Me...! challenge:


And the Mojo Monday sketch:


And that's that.  Have a great day, peeps.

Supplies, all SU!
Stamps:  Festive Flurry, Merry Everything
Ink:  Versamark, Night of Navy
Paper:  Brushed Silver, Night of Navy, Whisper White
Accessories:  Silver EP, Festive Flurry Framelits, Rhinestone, Dimensionals, Lucky Stars EF

Tuesday, December 9, 2014

Nachos: Very Merry Everything

Happy Tuesday morning, Nacho fans!  It's time for another great sketch from Nacho Average Challenges, so check out this beauty:


I had quite a few ideas for this one, but it's definitely time to buckle down and make some Christmas cards!  So here's my slightly nontraditional card:


I loved last year's winter DSP that had lots of Bermuda Bay in it and thought I could make that work with this year's All Is Calm DSP.  I tilted the DSP panel just for funsies, and I really wanted Bermuda Bay Candy Dots to put on the bottom but I'm out of that color and no matter how often I put on mood music and turn down the lights in my craft room, my remaining Candy Dots flatly refuse to get together and make new little baby Candy Dots for me.  So I used white Candy Dots instead and added a teensy border of torn Bermuda Bay cardstock, which turned out better than I'd anticipated it would.  Yay.

So you know what's next:  it's your turn!  Visit the Nacho blog for more eye candy and then make your own project for us to ooh and ahh over.  Cheers, peeps!

Supplies, all SU!
Stamps:  Merry Everything
Ink:  Bermuda Bay
Paper:  Smoky Slate, Bermuda Bay, Whisper White, All Is Calm DSP
Accessories:  Note Tag punch, Neutrals Candy Dots, Dimensionals, white organza ribbon

Monday, December 8, 2014

Three Dimensional Thinking

Ok, if you've been a regular visitor here at Snapdragon Stamps (hi Mom!) you know I pretty much stick to flat paper crafting--cards and scrapbook pages, not 3D items.  But every once in a while I want to try something new, so today I'm sharing a gift card holder box I made.


My friend Karyn's birthday is coming up next week, and I'm giving her a gift card, so this seemed like the perfect time to try out Qbee's Pop-Up Gift Card Box Tutorial.  The tutorial is easy to follow (I had it up on the iPad while I was at my craft desk) and the box isn't hard to make, but there are a few things I learned on the way that would make a second box easier.  For example, after you do the score lines and cut the tabs, next time I would fold along all the score lines and put the adhesive on the OTHER side of the cardstock.  I basically had to fold the cardstock the opposite direction that I'd scored because I put the adhesive on the "inside" side (that would make sense to you if you were trying to make this box, I think). 


Here's the inside, and that's a pack of Rolos because you know you get hungry when you're shopping if you do it correctly.  Here's another thing I learned:  maybe I made the slot for the gift card a little too wide, because it was kind of tilting so that the edge of the gift card was at the edge of the box and it didn't stand up straight.  So I stuck a Dimensional down in the bottom of the box and made sure that the gift card was put with the edge in front of that Dimensional and voila!  No more tilting.

So anyway, I'd say this little project definitely qualifies for the challenge at Create with Connie and Mary.


And I also used the fun color combination from Just Add Ink:


You're probably wondering, where's the Real Red?  To be honest, I don't like hot pink and red together, I think they clash :) but I *did* use Real Red ink to sponge the edges of the rose petals.  Now, pale pink and red I think is totally fine ;)  But just so you know, I DID use all the challenge colors on here.  And champagne glimmer paper, because it's fun.

So, would I make a box like this again?  Yeah.  Am I going to make a regular habit of it?  Probably not, I'm lazy and I'm used to thinking two-dimensionally ;)

Cheers, peeps!

Supplies, all SU!
Stamps:  Sweet Shoppe Alphabet (retired), Label Love
Ink:  Real Red, Wild Wasabi
Paper:  Tempting Turquoise, Strawberry Slush, Wild Wasabi, Whisper White, Champagne glimmer paper, retired Wild Wasabi DSP
Accessories:  Spiral Flower Bigz Die, Autumn Accents Bigz Die, Note Tag Punch, Itty Bitty Accents Punch Pack (heart), Decorative Label Punch, Artisan Label Punch, Hexagon Punch, Dimensionals, hot glue & Sticky Strip to adhere everything together